


Get started with Insider Risk Management Policy in Microsoft Purview
Insider threats pose a significant risk to organizations, with potential incidents such as IP theft, data leakage, and unauthorized access. To mitigate these risks, Microsoft Purview Insider Risk Management provides a framework to detect, analyze, and respond to internal threats efficiently.
A crucial first step in setting up Insider Risk Management is assigning permissions to designated users. This is done by adding them to the Insider Risk Management role group, ensuring they have access to manage risk policies effectively. Please note: it may take up to 30 minutes for these permissions to propagate across the organization.
Scenario
In this blog, you will explore the capabilities of Insider Risk Management, including how to:
- Identify potential risks within the organization.
- Apply risk policies to proactively mitigate insider threats.
- Respond to incidents efficiently using built-in security measures.
Objectives
We will do the following tasks:
✅ Task 1: Setting up an Insider Risk Permission.
✅ Task 2: Adjust Insider Risk Management Settings.
✅ Task 3: Creating a policy to manage insider threats.
✅Setting Up an Insider Risk Permissions
As a global administrator, you will grant permissions for Insider Risk Management by adding users to the appropriate role group. This ensures they can access and manage the security features needed.
Steps to Enable Permissions
1️⃣ Access Microsoft 365 Admin Center:
- Open Microsoft Edge and navigate to the Microsoft 365 Admin Center.
- From the left navigation pane, select Show all.

2️⃣ Navigate to Security Settings:
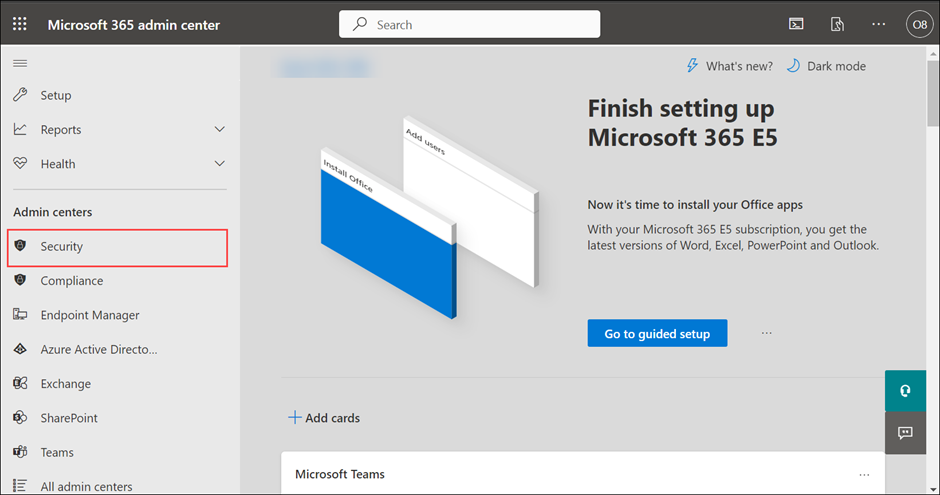
- Under Admin Centers, select Security.
- A new browser window will open to the Microsoft Defender portal.
3️⃣ Configure Permissions:
- In the Microsoft 365 Defender portal, select Permissions (you may need to scroll down).
- Under Email & Collaboration roles, select Roles.

4️⃣ Assign Insider Risk Management Role:
- In the search bar, type Insider Risk and press enter.
- Select Insider Risk Management from the list.

5️⃣ Edit Members & Assign Users:
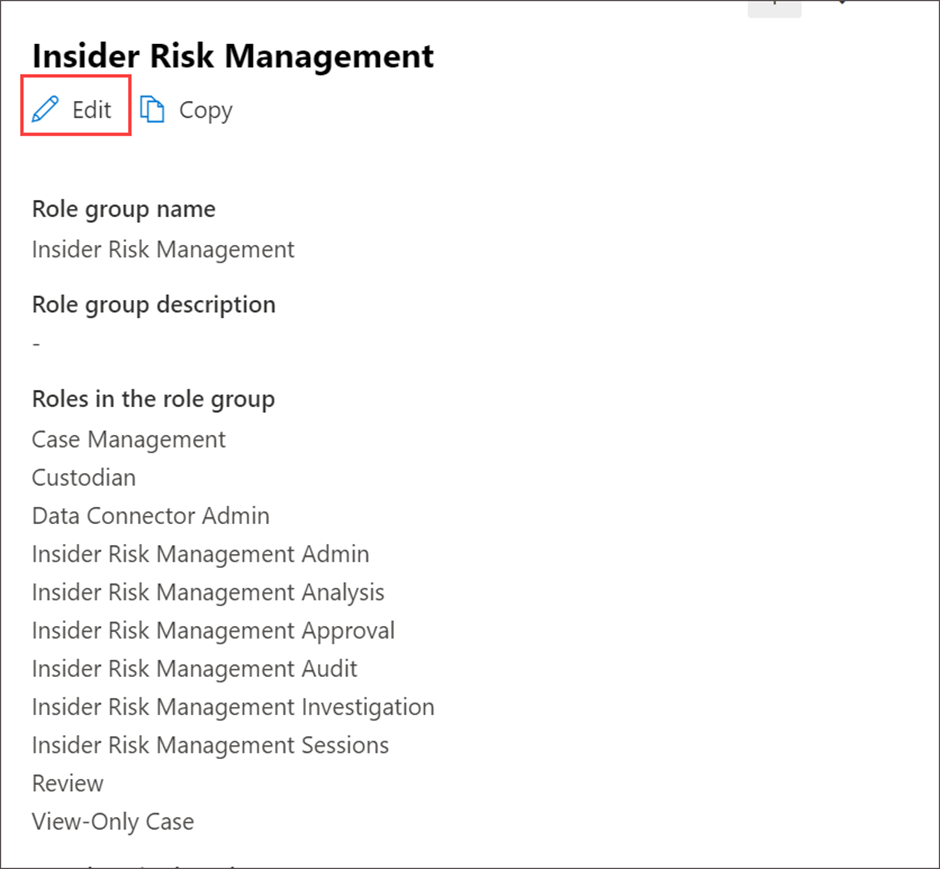
- Click Edit next to the Members section.
- Click Choose users, select the appropriate users, then click Select.
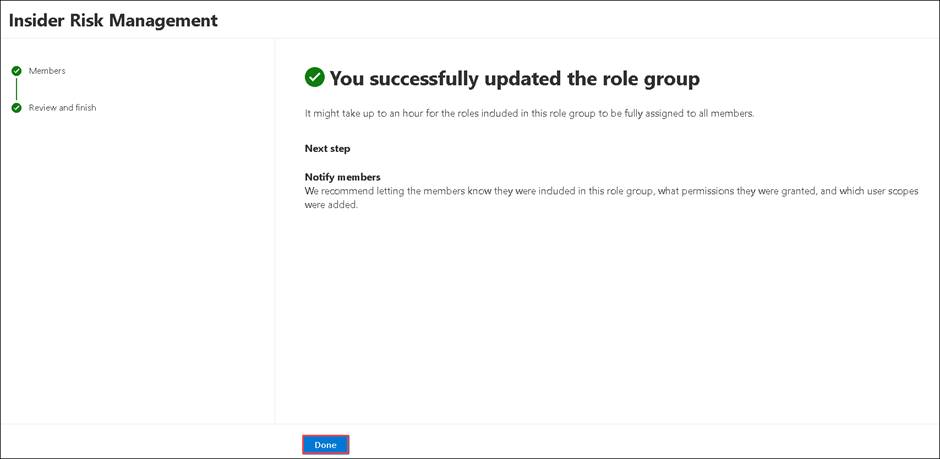
- Click Next, verify the members, and click Save.
- Click Done to finalize the assignment.


6️⃣ Verify Permissions & Sign Out:
- Close all tabs except the Microsoft 365 Admin Center.
- Sign out and sign back in to reflect the changes faster.
✅Adjust Insider Risk Management Settings
Before setting up a policy, essential Insider Risk Management settings must be configured.
Step-by-Step Configuration
1️⃣ Access Microsoft Purview:
- Open Microsoft Edge and navigate to Microsoft Purview.
- From the left navigation pane, under Solutions, select Insider Risk Management

2️⃣ Adjust Insider Risk Management Settings:
🔹 Privacy Tab: Determines whether usernames appear in risk reports or remain anonymized.
- Select Do not show anonymized usernames → Click Save.

🔹 Policy Indicators Tab: Defines how detected activities contribute to a user’s risk score.
- Scroll through available indicators → Under Office indicators, select Select all → Click Save.

🔹 Policy Timeframes Tab: Controls detection windows for insider risk activities.
- Activation Window – Defines how long a policy remains active after being triggered.
- Past Activity Detection – Sets how far back policies detect user activities.
- Keep default values → Proceed to Intelligent Detections Tab.

🔹 Intelligent Detections Tab:
- Review detection settings → Scroll down to Alert Volume → Move the slider to More alerts.

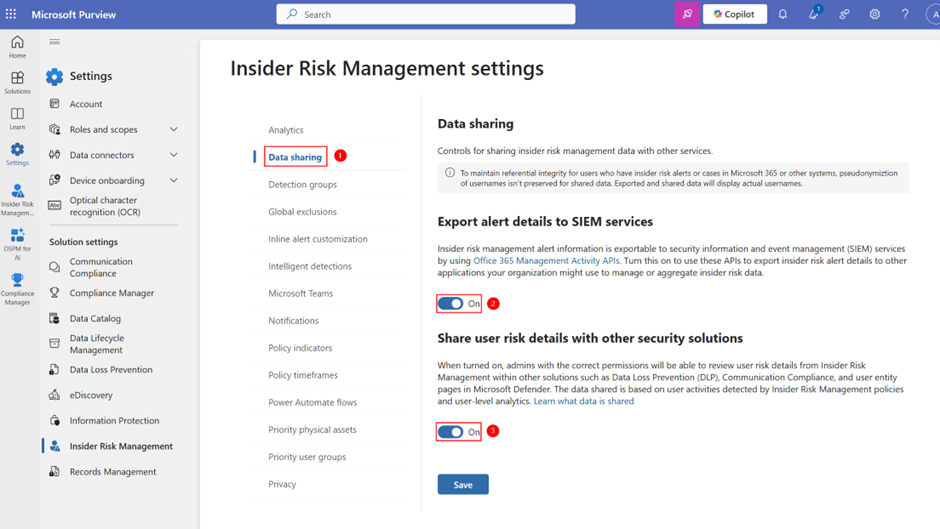
🔹 Data Sharing Tab:
- Enable Export alert details to SIEM services.
- Enable Share data with Microsoft Defender XDR.
🔹 Admin Notification Settings:
- Turn on all checkboxes → Click Save.

✅ Creating an Insider Risk Policy
1️⃣ Ensure you are on the Insider Risk Management page. If not, open the tab labeled Insider Risk Management – Microsoft 365 Compliance.
2️⃣ Click on the Policies tab, then select + Create Policy

4. Define Policy Settings
3️⃣ Select a Policy Template:
- Choose Data Leaks → Read the details → Click Next

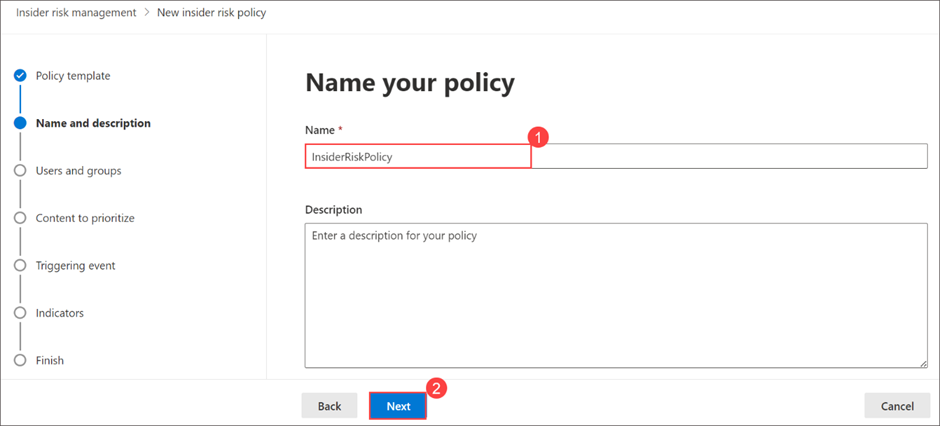
4️⃣ Name Your Policy:
- Enter InsiderRiskPolicy (1) → Click Next (2).
5️⃣ Choose Users and Groups:
- Select Include all users and groups (1) → Click Next (2).

6️⃣ Prioritize Content:
- Read the description → Select I don’t want to prioritize content right now (1) → Click Next (2).

7️⃣ Choose a Triggering Event:
- Select User performs an exfiltration activity (1) → Click Turn on Indicators (2) → Enable Turn on all indicators.

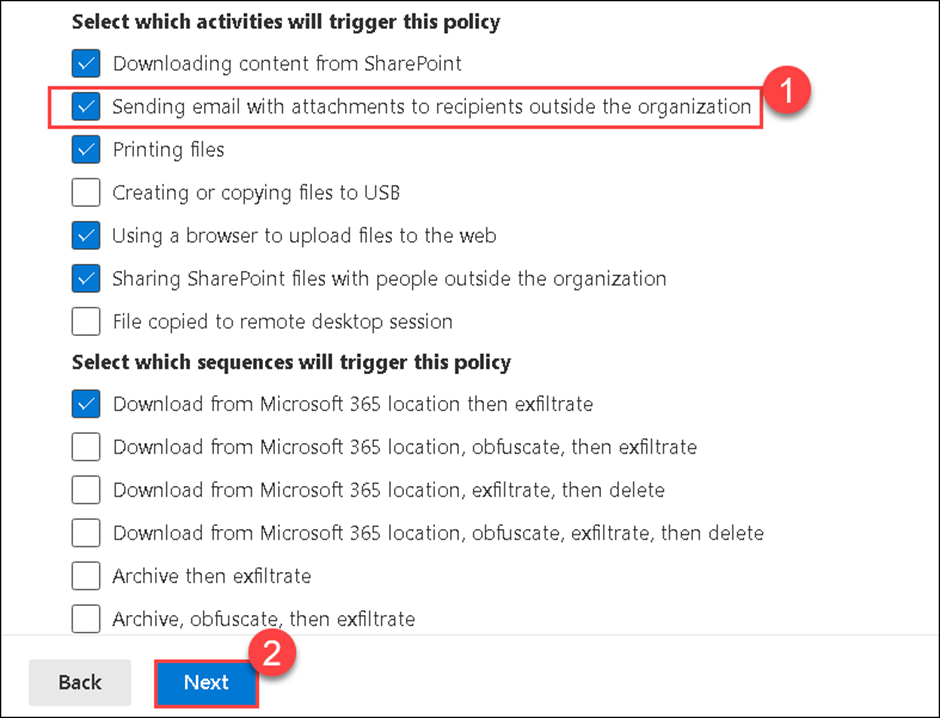
8️⃣ Define Triggering Activities:
- Select Sending email with attachments to recipients outside the organization (1) → Click Next (2).
5. Configure Risk Thresholds
9️⃣ Set thresholds for triggering events:
- Choose Set your own thresholds → Modify Total number of activities to 1 → Click Next.

🔹 Triggering thresholds: Define risk level parameters. Indicators activate only after a policy is triggered.
🔹 Indicators Page: Review details → Leave default settings → Click Next.

🔹 Detection Options Page: Review details → Click Next.

🔹 Threshold Type for Indicators: Select Apply thresholds provided by Microsoft (1) → Click Next (2).

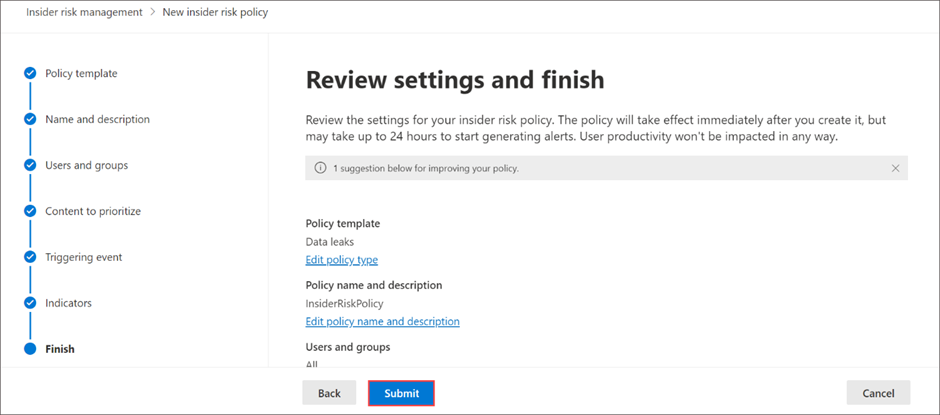
🔹 Final Review & Submission:
- Review configured settings → Click Submit → Click Done.
6. Activate Risk Scoring
1️⃣ Return to the Policies tab. The newly created policy will be listed.

2️⃣ In the Users in scope section, risk scores are assigned only after a policy trigger occurs.
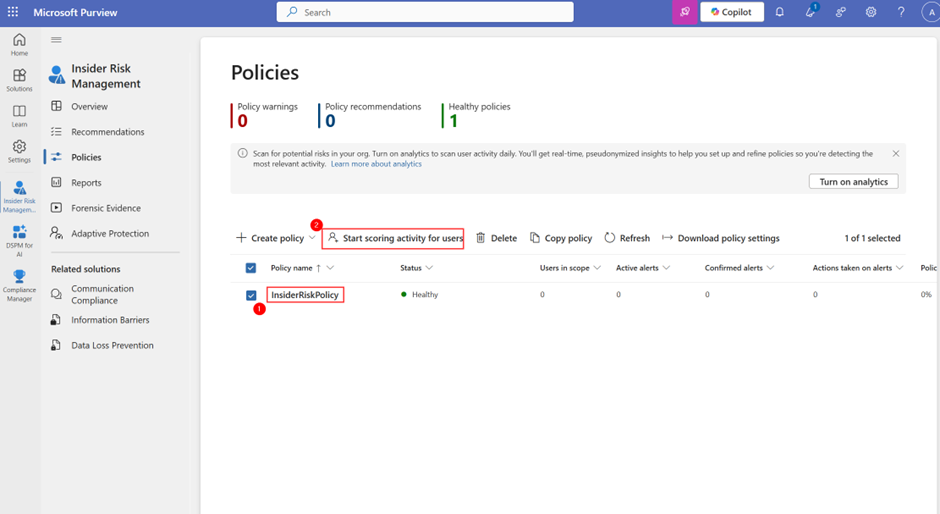
3️⃣ To start assigning risk scores manually:
- Select the checkbox next to the policy name (1) → Click Start Scoring Activity for Users (2).
- Enter scoring details:
- Reason for scoring activity → Provide a justification.
- Score activity duration → Set 5 days.
- Assign users → Enter the user email addresses.
- Click Start Scoring Activity (4) → Close the pane.

💡 Note: It may take up to 24 hours for users to appear in the Users tab after assigning scores.
🔒 Responding to Detected Risks
Once a policy is triggered and users are assigned a risk score, Microsoft Purview initiates built-in response workflows. These include:
- Automated alerts to security teams for high-risk activities
- Detailed activity logs for investigation via Microsoft 365 Defender
- Integration with Microsoft Defender XDR and SIEM systems for escalated response actions
- Manual intervention tools, such as initiating user access reviews or starting a formal investigation
These built-in security measures ensure that incidents are not only detected early but can also be addressed swiftly and in line with your organization’s compliance and risk posture.
Conclusion
By configuring Insider Risk Managemfent settings and creating risk policies, your organization gains enhanced visibility into internal security threats. These measures enable early risk detection, minimize data breaches, and strengthen security posture.
Discover more from Blogs | Saied Taki
Subscribe to get the latest posts sent to your email.